Why Won’t OBS Record Me Playing Project 64?

Recording Project 64 gameplay with OBS should be straightforward, but it doesn’t always work as expected. You fire up Project 64, launch your favorite Nintendo 64 title, and hit Start Recording in OBS—only to end up with a black screen, a missing emulator window, or a recording that captures nothing but frustration. These problems can be especially frustrating when OBS works normally with other applications.
In this guide, we’ll explain the most common reasons OBS fails to capture Project 64 and walk you through several practical solutions. We’ll also introduce a simpler screen-recording option, for users who want to capture their gameplay without spending too much time adjusting OBS settings.
1. Why Won’t OBS Record Me Playing Project 64?
OBS may not record Project 64 gameplay because it cannot properly capture the emulator’s video output.
Possible reasons:
- Project 64 isn’t detected by Game Capture.
- OBS capture mode is incompatible with the emulator.
- Graphics or video plugin settings are causing a black screen.
- OBS and Project 64 have different permissions.
- GPU settings are conflicting between the two programs.
- OBS settings or drivers are outdated.
2. How to Resolve “OBS Won’t Record Me Playing Project 64”?
Try the following methods in order. After each method, make a short test recording to check whether Project 64 is being captured correctly.
Method 1: Switch from Game Capture to Window Capture
Game Capture is often the first option users try in OBS, but it may not work properly with every emulator configuration.
Steps:
- Open Project 64 and launch the game you want to record.
- Open OBS Studio and click the + button in the Sources section, then select Window Capture.
- Create a new source and select the Project 64 window.
- Check the OBS preview to see whether the gameplay appears.
- Resize the capture source if necessary.
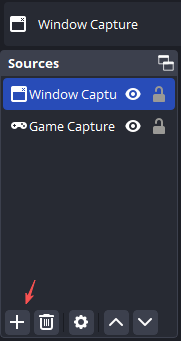
If Project 64 appears in the preview, make a short recording and check the resulting video.
Method 2: Try Display Capture
If Window Capture doesn’t work, Display Capture is another useful option. Instead of trying to identify the Project 64 window specifically, it records everything displayed on your monitor.
Steps:
- Open Project 64 and start your game.
- Return to OBS, add a new source by clicking + under Sources and select Display Capture.
- Choose the monitor where Project 64 is running.
- Confirm that the emulator appears in the preview.
- Start a short test recording.
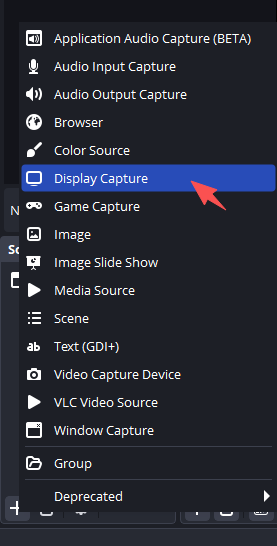
The main drawback is that Display Capture records your entire screen. Close unnecessary windows and disable desktop notifications if you want a cleaner gameplay recording.
Method 3: Run OBS and Project 64 with the Same Permissions
Windows permissions can sometimes prevent OBS from capturing another application correctly. This can happen when one program is running as administrator and the other isn’t.
Steps:
- Close OBS and Project 64, then restart both applications.
- Make sure they are running with the same permission level.
- If necessary, right-click OBS and select Run as administrator.
- Launch Project 64 and start your game.
- Add your preferred capture source in OBS.
- Test the recording again.
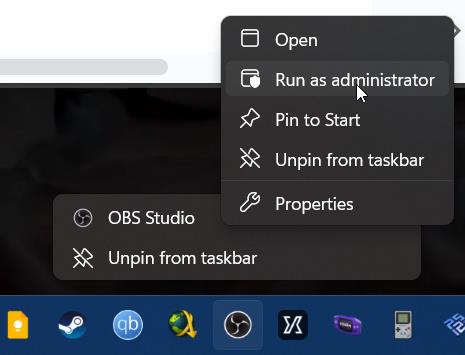
Keeping the two applications at the same permission level can help eliminate potential access conflicts.
Method 4: Check Your GPU Settings
A GPU conflict can also cause OBS to display a black screen. This is particularly common on laptops with both integrated and dedicated graphics.
Steps:
- Open Windows Settings, then go to the graphics or display settings.
- Find the options for assigning graphics performance to individual applications.
- Add OBS if it isn’t already listed; Add Project 64 as well.
- Try configuring both applications to use the same GPU.
- Restart OBS and Project 64, then test your recording again.
If the problem started after changing graphics hardware or drivers, checking these settings is especially worthwhile.
Method 5: Change Project 64’s Graphics Configuration
Project 64 can use different graphics plugins and rendering options. Depending on your setup, a particular graphics configuration may not work well with OBS.
Steps:
- Open Project 64, then go to its graphics or video configuration settings.
- Check the currently selected graphics plugin or rendering option.
- Try another compatible option if available.
- Save the changes and restart Project 64.
- Open OBS and test the capture again.
Make changes one at a time. This makes it easier to identify which setting resolves the issue.
Method 6: Update OBS and Graphics Drivers
Outdated software can sometimes create compatibility problems between OBS, Project 64, and your graphics hardware.
Steps:
- Check whether you’re using the latest available version of OBS; Update OBS if necessary.
- Check for available graphics driver updates and install the appropriate driver update.
- Restart your computer; Open Project 64 and OBS again, then make another test recording.
If you’re using an older computer or graphics card, also check that your system meets the current requirements of the software versions you’re using.
Method 7: Check OBS Recording Settings
If Project 64 appears in the OBS preview but not in the final video, check your recording configuration:
- Go to OBS Settings > Output and review the recording options.
- Confirm the recording path is valid and accessible.
- Make sure you have enough free storage space.
- Check the recording format and encoder, then save the settings.
- Make a short test recording and play it back to confirm the gameplay was captured.
3. Try the Simple Screen Recorder – Swyshare Recordit
If you’ve tried the methods above and OBS still won’t record Project 64, using a simpler screen recorder may be the easiest solution.
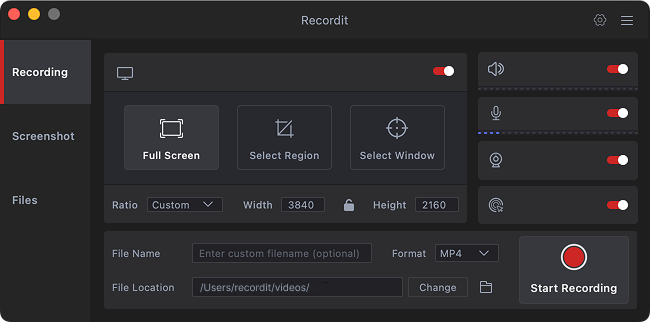
Swyshare Recordit provides a more straightforward approach to screen recording. Instead of spending time troubleshooting Game Capture, Window Capture, GPU settings, scenes, and other OBS configurations, you can use a dedicated recorder to capture what’s happening on your screen.
Steps to record Project 64 with Recordit:
- Open Project 64 and launch your game.
- Start Swyshare Recordit and select the screen or recording area you want to capture.
- Adjust the available recording settings and start recording.
- Play Project 64 normally while Recordit captures the screen.
- Stop the recording when you’re finished, then save and review the recorded video.
4. Conclusion
If OBS won’t record Project 64, try switching capture sources, checking permissions and GPU settings, and updating your software. If the problem persists, Swyshare Recordit is a simpler alternative. With an easy recording process and fewer settings to configure, Recordit is a convenient choice for recording Project 64 gameplay.