How to Record Audio Sent in Facebook Messenger Using Audacity?

Facebook Messenger is one of the world’s most widely used messaging platforms, allowing users to exchange text messages, voice recordings, photos, videos, and make voice or video calls. Voice messages, in particular, are a convenient way to communicate, but Messenger doesn’t always provide an easy way to download or save these recordings for offline listening.
One practical solution is to record the audio as it plays through your computer. This method works whether you’re preserving an important conversation, saving educational content, or archiving memorable voice messages. Among the many audio recording applications available, Audacity has remained a popular choice thanks to its powerful recording and editing capabilities.
In this guide, you’ll learn how to record audio sent in Facebook Messenger using Audacity, explore its advantages and disadvantages, and discover a much easier alternative, which lets you record both screen and audio with just one click.

1. What Is Audacity?
Audacity is a popular free, open-source audio editor and recorder that works on Windows, macOS, and Linux. It has been trusted by musicians, podcasters, educators, and everyday users for years because it offers professional-level audio recording and editing without requiring a paid subscription.
Besides recording microphone input, Audacity can also capture your computer’s system audio using supported audio hosts such as Windows WASAPI. Once recorded, users can edit the audio by trimming unwanted sections, reducing background noise, adjusting volume levels, adding effects, and exporting recordings in popular formats like MP3, WAV, FLAC, and OGG.
2. How to Record Audio Sent in Facebook Messenger Using Audacity?
Recording Messenger audio with Audacity is relatively straightforward once your recording settings are configured.
Follow these basic steps:
- Download and install the latest version of Audacity.
- Open Audacity and set the Audio Host to Windows WASAPI (on Windows).
- Select your speaker or headphone device with Loopback enabled as the recording source.
- Open Facebook Messenger in your browser or desktop app.
- Click the Record button in Audacity.
- Play the Messenger voice message or audio clip.
- When playback finishes, click Stop in Audacity.
- Optionally trim or edit the recording.
- Export the recording as MP3, WAV, or another preferred format.
After exporting, you’ll have a local copy of the Messenger audio that you can play anytime.
3. Pros and Cons of Using Audacity to Record Computer Audio
Audacity offers excellent recording quality, but it isn’t the perfect solution for every user.
Pros:
- Completely free and open-source.
- Records high-quality system audio.
- Includes powerful built-in audio editing tools.
- Supports multiple export formats.
- Available on Windows, macOS, and Linux.
Cons:
- Initial setup can be confusing for beginners.
- Requires selecting the correct recording device and audio host.
- Records audio only—not your screen.
- Switching between Audacity and Messenger during recording can be inconvenient.
- Better suited for audio production than quick everyday recording tasks.
For occasional audio editing, Audacity remains an excellent choice. However, users who mainly want to capture computer audio quickly may prefer a simpler recorder.
4. Try Swyshare Recordit Instead of Audacity
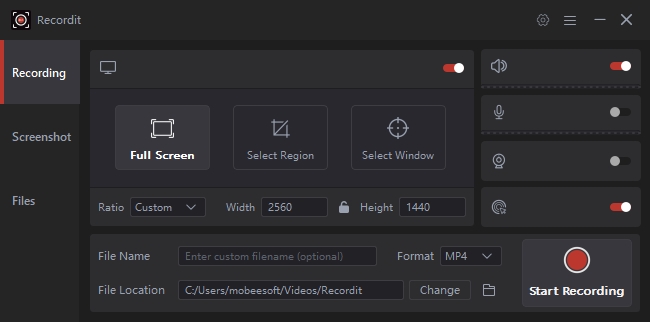
If you’re looking for a faster and easier way to save Facebook Messenger voice messages, Swyshare Recordit is an excellent alternative. Unlike Audacity, Swyshare Recordit combines screen recording and audio capture in a single, easy-to-use application. Whether you’re recording Facebook Messenger voice messages, video calls, webinars, streaming videos, or tutorials, Recordit makes the process quick and effortless.
Key Features of Swyshare Recordit:
- Flexibly record the entire desktop, a single window, or a custom screen area.
- Capture system/microphone audio with crystal-clear quality.
- Save recordings in high-quality MP4 or other popular format.
- Schedule recordings to start and stop automatically at a specified time.
- Trim, cut, and fine-tune your recordings with the built-in video editor.
- Work on both Windows and Mac.
How to Record Messenger Audio with Swyshare Recordit:
- Set up and launch Swyshare Recordit.
- Choose the recording area, then turn on system audio to capture Messenger playback; Enable the microphone if you also want to record your voice.
- Start the recording and play the Messenger audio message you want to capture.
- Once the audio finishes playing, stop the recording and locate it in the “Files” tab. You can then open it in Recordit’s built-in editor to trim the video or add a logo or watermark.
4. Conclusion
Audacity is a reliable, feature-rich audio recorder that makes it possible to capture audio sent in Facebook Messenger while providing professional editing tools for refining your recordings. Since it’s completely free and supports high-quality system audio recording, Audacity is an excellent option for users who don’t mind configuring recording settings and making basic audio edits.
However, if your main goal is to save Messenger audio or record video calls, online meetings, webinars, or streaming content, a dedicated screen recorder provides a much simpler and more efficient solution. Swyshare Recordit eliminates the need for complex audio configuration by allowing you to record both screen and system audio with a single click. Its intuitive interface, flexible recording options, and high-quality output make it a practical solution for beginners and experienced users alike. If you value convenience, speed, and versatility, Swyshare Recordit is a highly recommended alternative to Audacity for recording Facebook Messenger audio.