How to Set Video Recording Limit on Phone?

Recording videos on a phone is convenient, but long recordings can quickly become a problem. A high-quality video may take up a large amount of storage, consume battery power, and cause the phone to become warm during extended recording sessions. If you often record tutorials, meetings, gameplay, or everyday moments, you may want to set a video recording limit on your phone.
In this guide, we’ll explain several ways to set a video recording limit on your phone. We’ll also introduce a simple screen recorder that lets you record your phone screen through a PC after mirroring the phone display.

1. How to Set Video Recording Limit on Phone?
The exact method depends on whether you’re recording with the phone’s camera or its built-in screen recorder. The following methods cover the most common options.
1.1 Check the Camera App Settings
If you want to limit the length of a video recorded with your phone’s camera, start by checking the settings in the default Camera app.
Open the Camera app and switch to Video mode. Look for a gear icon, three-dot menu, or Settings option. Depending on your phone manufacturer and camera app, you may find options related to video duration, resolution, frame rate, or storage.
If your device provides a Recording Duration, Video Length, or Auto Stop option, select it and choose your preferred recording time.
Not every phone includes a dedicated recording-duration setting. If you can’t find one, try one of the alternative methods below.
1.2 Check the Screen Recording Feature
If you’re trying to limit a screen recording, check your phone’s built-in Screen Recorder.
On many Android phones, you can:
- Swipe down from the top of the screen.
- Open the Quick Settings panel.
- Find Screen Recorder or Screen Recording.
- Tap it to view the available options.
- Check for a duration, timer, or automatic-stop feature.
Some phones allow you to configure recording settings before starting. However, the available options vary by device and operating-system version.
On some devices, there may be no built-in way to automatically stop a recording after a specific period.
1.3 Use a Third-Party Recording App
If your phone’s default recorder doesn’t offer a recording limit, you can use a third-party recording application.
Look for an app that supports features such as Auto Stop, Recording Timer, or Maximum Duration. After installing the application, open its settings and configure the desired recording time.
This method can be useful when you regularly need recordings of a fixed length. For example, you might want every tutorial clip to be limited to 10 minutes or automatically stop a recording after 30 minutes.
Before installing an app, check its permissions and make sure it comes from a trustworthy source.
1.4 Use a Timer as a Simple Workaround
If you don’t want to install another application, your phone’s built-in Clock or Timer app can provide a simple workaround.
For example, if you want to record for 20 minutes, set a 20-minute timer before starting the recording. When the timer finishes, stop the recording manually.
This doesn’t automatically stop the camera on every phone, but it’s an easy way to avoid accidentally leaving the camera running for hours.
1.5 Reduce Video Quality to Control Recording Size
A recording limit isn’t only about time. Storage space is another important consideration.
If you’re recording at 4K resolution or a high frame rate, your videos can become very large. Lowering the resolution to 1080p or another suitable setting can significantly reduce file size.
You should also check how much free storage your phone has before starting a long recording. Keeping enough free space helps prevent recordings from stopping unexpectedly.
2. Bonus: Record Phone Screen on PC with Swyshare Recordit
If your phone’s built-in recorder doesn’t give you enough control, another option is to display your phone screen on a PC and record it there with Swyshare Recordit.
Swyshare Recordit is a screen-recording tool designed to make desktop recording straightforward. Instead of relying entirely on your phone’s recording capabilities and internal storage, you can mirror your phone screen to a computer and capture the displayed content using Recordit.
Key features of Recordit:
- High-Quality Screen Recording – Record PC and phone screens.
- Webcam & Audio Recording – Capture webcam, system audio, and microphone.
- Schedule & Instant Replay – Schedule recordings or save recent screen activity.
- Built-in Video Editor – Trim, resize, add backgrounds, watermarks, and more.
- Multiple Output Formats – Export videos as MP4, GIF, or MP3.
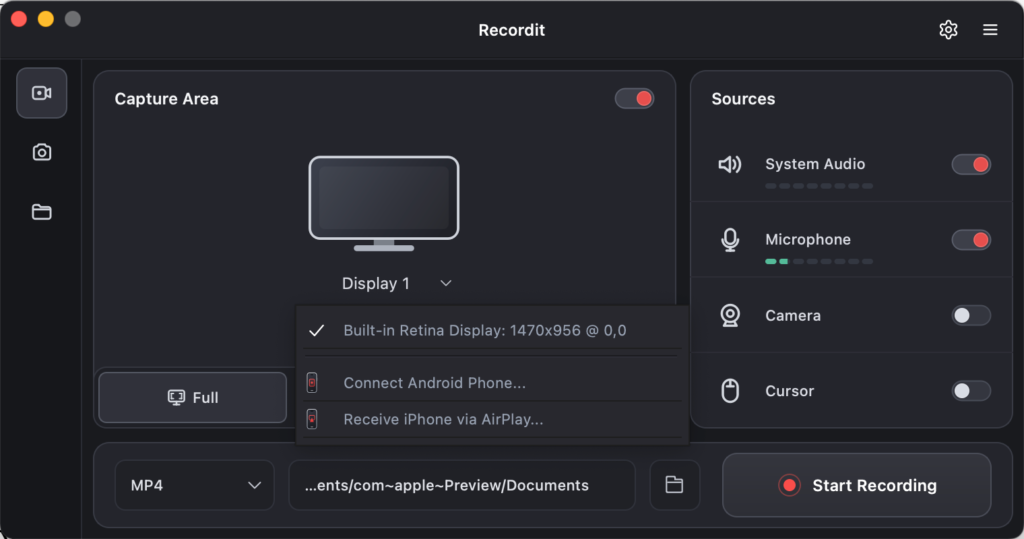
How to record phone screen with Recordit:
- Download, set up and open Recordit on your PC device.
- Click the drop-down menu next to “Display”, then choose “Connect Android Phone” for Android devices or “Receive iPhone via AirPlay” for iPhones.
- Click Start Recording and begin using your phone. Recordit will capture the phone activity displayed on your computer.
- Stop the recording and use Recordit’s built-in editor to trim or customize the video.
3. Conclusion
Knowing how to set a video recording limit on your phone can help you manage recording time, storage space, and battery consumption. Depending on your device, you may be able to configure a recording duration directly through the Camera or Screen Recorder settings. If that option isn’t available, you can use a third-party app or simply set a timer as a reminder to stop recording.
For longer or more demanding screen-recording tasks, recording your phone screen through a PC can be a practical alternative. After mirroring your phone display to your computer, Swyshare Recordit provides an easy way to capture the activity and save the recording on your PC.